
This article explains how to set up Microsoft Visual Studio to build ISOC++2 OpenSplice DDS based applications.
Setting up Microsoft Visual Studio to use ISOC++2 with OpenSplice DDS
Setting up Microsoft Visual Studio to use ISOC++2 for OpenSplice DDS applications can seem complex. This article gives a step by step overview of the process.
Overview of the process
The steps you need to take to build an ISOC++ application with OpenSplice DDS are:
- Manually precompile the idl files and add the generated source code into your Visual Project
- Make sure the environment variable OSPL_HOME is known by Visual Studio. You can do this by:
- Defining it as a global environment variable in your system or
- Start Microsoft Visual Studio from a console window that sourced the %OSPL_HOME%\release.bat. It is best to start the console window through the OpenSplice launcher. Defining the OSPL_HOME through the sourcing the release bat will ensure that the $PATH, the $ZETTASCALE_LICENSE for v7 (or $ADLINK_LICENSE for v6) and the $OSPL_URI environment variables are set correctly. These additional variables are the key to the execution of your DDS application.
- Create a new C++ project in Microsoft Visual Studio
- Add the idlpp generated file obtained in step 1 to your project by updating your project property page with
- The OpenSplice DDS (.h/.hpp) required files, in section Property/CC++/General/”Additional Include Directories” with the value: $(OSPL_HOME)\include;$(OSPL_HOME)\include\sys;.;$(OSPL_HOME)\include\dcps\C++\isocpp2;$(OSPL_HOME)\include\dcps\C++\SCCPP
- The OpenSplice DDS libraries (‘lib) in section Property/Linker/General/”Additional Library Directories” with the value: .;$(OPSL_HOME)\lib;(AdditionalLibraryDirectories)
- The section Property/Linker/General/”Additional Dependencies with the value: dcpsisocpp2.lib;ddskernel.lib;%AdditionalDependencies)
- A Release build should work by standard but Debug builds may require additional setup. Please refer to this additional article for help Compiling ISOC++2 Applications under Visual Studio: Release and Debug Configuration
- Add the .hpp generated file you obtained in step 1 to your CPP code, for instance in your main() function. For example, if your idl file is called Foo.idl include the “Foo_DCPS.hpp” header in your code. Please add our includes above any windows system includes like “windows.h” to avoid memory heap crashes.[YourIDLFileName_DCPS].hpp is the one that needs to be included in your C++ code.
- When you finish building your code make sure you run it from a console where all the environment variables have been set correctly. We remind you that the overall environment variables can be set automatically and consistently in the console when the later is created by the launcher tool.
Additional Details for Process
The upcoming sections detail the above process and present an alternative if you want to invoke the OpenSplice idl pre-processor from MS Visual Studio. An experienced developer can normally skip these basic MS Visual steps, unless he wants to invoke the idl processor from his project.
How to start Visual Studio from the OpenSplice launcher console
First start the OpenSplice launcher. This can be done from the icon on the start menu or using the command ospllauncher from a console window. If you are running from a console window you need the %OSPL_HOME% environment variable set. You can also double click on the ospllauncher.bat file in the %OSPL_HOME%\bin\. This will bring up the OpenSplice launcher GUI.

Press console to bring up a console window with all the OpenSplice DDS environment variables set up in it. Now start Microsoft Visual Studio from this console window. S

Generating the OpenSplice DDS classes belonging to your data model
As discussed earlier there are two options to achieve this step:
- manually
- through Microsoft Visual Studio
The manual process
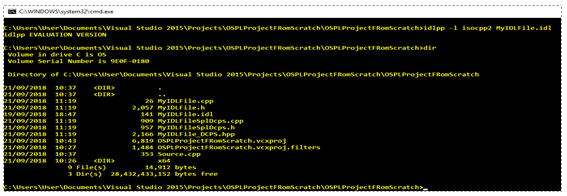
Start a console window from the OpenSplice launcher. To compile the idl use the following command:
> idlpp -l isocpp2 MyIDLFile.idl
where MyIDLFile.idl is the name of the file you wish to compile.
This command will generate the following files:
- [MyIDLFile].cpp
- [MyIDLFile].h
- [MyIDLFile SplDcps].cpp
- [MyIDLFile SplDcps].h
- [MyIDLFile _DCPS].hpp
[MyIDLFile _DCPS].hpp is the one that needs to be included in your C++ code.
When creating your own C++ project the previous files need to be added in your project.
The automated process using Visual Studio
This method is more elegant, but comes with some drawbacks. It can require some extra effort to get it to work properly. The main issue comes when the idlpp precompiler reports errors, for instance if the idl file is not correctly written. We therefore recommend using a correct idl file before proceeding.
This approach presumes that you already created your C++ project.
The details are described below:
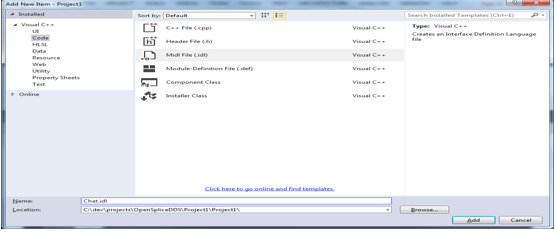
Add a New Item in the Source Project section. Add new item in source project – code and mild file by right clicking source > add new midl. We will name the file “Chat.idl”
Click Add, then select the import lines that VS puts in the idl file and delete them.
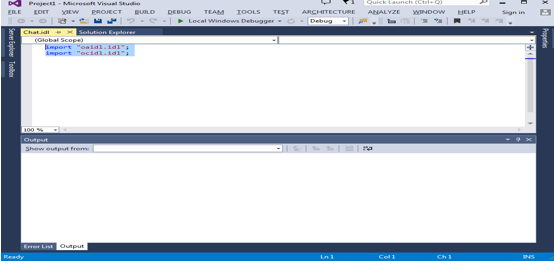
Next put in your IDL code, here is an example.

Now we need to fix this file so that it is not be compiled by VS MIDL compiler but is compiled by the OpenSplice IDL compiler.
To do this select the Chat.idl file from the Source Files and right click and select properties.
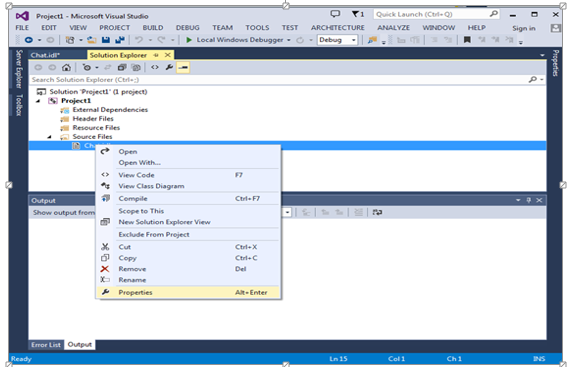
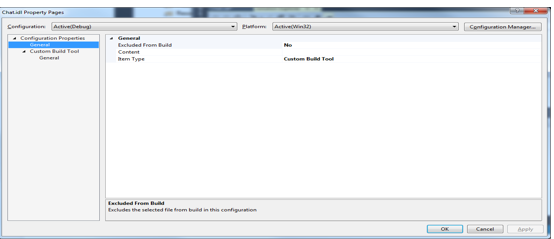
From the properties under configuration properties set the items shown in the picture below.
- select the General item under “Custom Build Tool”
- Set Exclude from build to NO
Check to make sure you are using the right configuration and the correct platform (x64 or 32 bit), if this is not correct change it in the configuration and platform section at the top.
Then in the same panel select:
Custom Build >tool> General>Command-Line and set
- with IsoC++ APIs usage , Set idlpp –l isocpp2 –d idl Chat.idl
Note: you have to manually add the idl folder under your project (see next screen)
- Set “Treat Output as Content” to Yes
- Set Link Objets: NO
This will generate .cpp files for your data types under <MyProject>/<Myproject>/idl directory
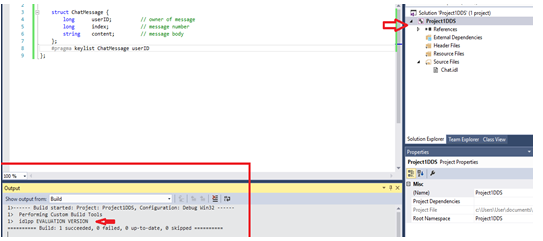
Make sure you are on the active Project Debug or Release; x64 or x32.
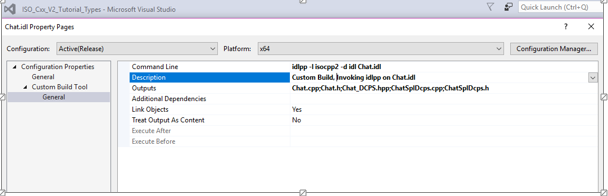
The outputfiles in this project are Chat.cpp; Chat.h; Chat_DCPS.hpp; ChatSplDcps.cpp; ChatSplDcps.h
The Outputs section should contain the name of the 5 expected Files. These names must be as follow:
- [YourIDLFileName].cpp
- YourIDLFileName].h
- [YourIDLFileNameSplDcps].cpp
- [YourIDLFileNameSplDcps].h
- YourIDLFileName_DCPS].hpp
[YourIDLFileName_DCPS].hpp is the one that needs to be included in your C++ code.
Now we need to select the project and perform a build. This will invoke the custom build process for the IDL file and will generate all of the platform specific files.
Notes
- If you need to find the command line for the idlpp compiler simply select the idl file and you can see this in the properties
- If the customer build tool section remains empty and nothing is generated your current project active platform is not the same as the Custom build tool section defined in the properties of your idl file.
- At this stage you have not yet added C++ files to your project. Your project properties will not include the C/C++ properties section. Microsoft Visual Studio will add this later when you add the C++ generated files to your project.
Now we need to add all of the output files to the project.
- We add the generated output files by right clicking on the source files and selecting add existing items.
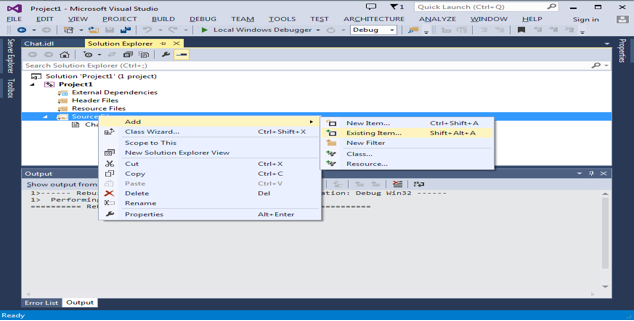
Select all of the .cpp files in the idl folder and add them to the project.
Code Source Shape
The structure of the code could look like this; basically the <MyIDLFile_DCPS.hpp> (e.g Chat_DCPS.hpp) should be included. Please refer to the complete tutorial example and the development Guides to complete the code.
#include “Chat_DCPS.hpp”
int main()
{
/** A dds::domain::DomainParticipant is created for the default domain. */
dds::domain::DomainParticipant dp(org::opensplice::domain::default_id());
dds::topic::qos::TopicQos topicQos= dp.default_topic_qos()
<< dds::core::policy::Reliability::Reliable();
…..
}
Adding OpenSplice DDS includes
Now all we have left is to set the project includes in libraries to link.
Let’s set the include directories first.
From the Solution Explorer right click on our project, “Project1” in this case and select “Properties”.
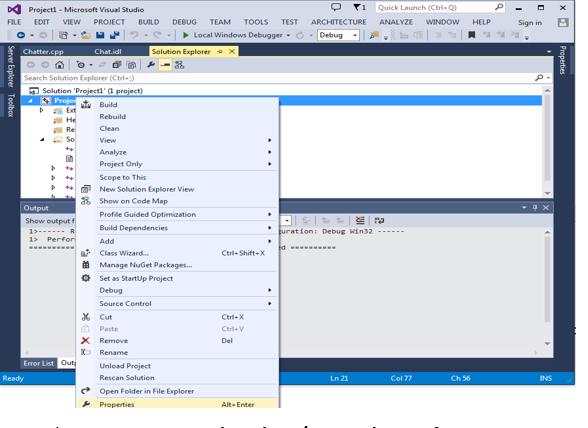
From the Property Page select the C/C++ under Configuration Properties and expand that item.
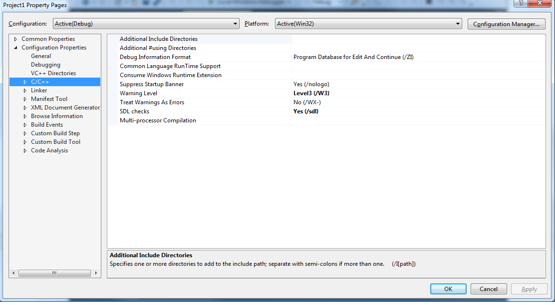
With VS 2015 Go to C/C++/General item and
For ISO C++ APIs add :
$(OSPL_HOME)include;$(OSPL_HOME)include\sys;$(BOOST_ROOT)\.;$(OSPL_HOME)include\dcps\C++\isocpp2;$(OSPL_HOME)include\dcps\C++\SACPP;.; %(AdditionalIncludeDirectories)
Disabling Harmless Warnings
You can disable some unharmful warnings by Setting Proejct Property/ C-C++/Advanced panel :
- Disable Specific Warnings: 4355;4251;%(DisableSpecificWarnings)
Setting the linker options
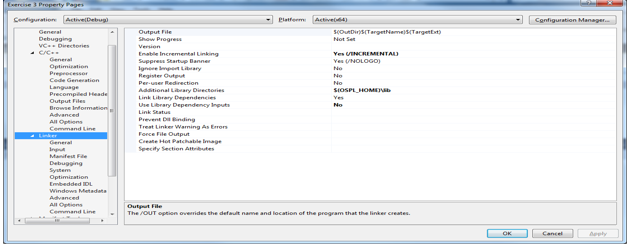
Next we set the linker options.Go to Linker/General item
Add $(OSPL_HOME)lib in the “Additional Library Directories”
Select the Input section under Linker of the Additional Dependencies.
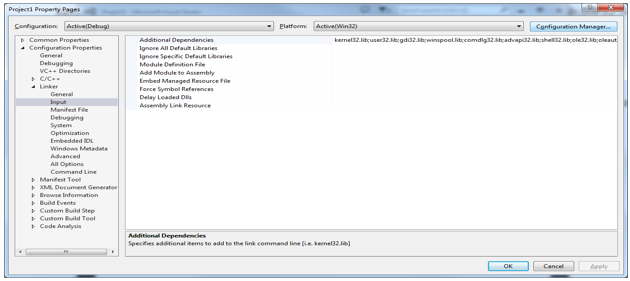
Set the library files to add to the “Input” section of the “Linker” item. Add : lib;ddskernel.lib;%(AdditionalDependencies)
At this stage you should be able to successfully build your code