This article explains the steps you need to take to connect one application to multiple DDS domains using OpenSplice.
Using DDS in multiple domains
For two DDS applications to communicate with each other they need to join the same DDS domain. Occasionally your application may need to receive data from one domain and send it to another. It is possible to do this but you will need to do some extra configuration.
What is a domain
A domain is the global data space that links all the applications that share the same domain id. Domains are independent from each other. A DDS application will send and receive data within one domain.
A network can contain one or more domains and a domain can span one or more networks.
Domains are identified by means of a domainid. This is an integer.
Read more: Overview of DDS
How do I know which domain my application is using?
In OpenSplice the OSPL_URI environment variable refers to an XML configuration file that describes the OpenSplice deployment. The xml file defines and configures all the OpenSplice services.
These are
- spliced – The default service, also called the domain service; the domain service is responsible for starting and monitoring all other services.
- durability – This service is responsible for storing non-volatile data and keeping it consistent within the domain (optional).
- networking – This service realizes user-configured communication between the nodes in a domain.
- tuner – This service provides a SOAP interface for the OpenSplice Tuner to connect to the node remotely from any other reachable node.
The configuration file will contain all the technical details of the domain, the domainid, port number and the services it runs. You can change the domain id in the configuration file.
Read more: OpenSplice DDS configuration file
How can I get my DDS application to operate in multiple DDS domains?
OpenSplice will allow a DDS application to operate in multiple domains. Currently this is only supported in shared memory deployments. Each domain running on a node must have its own shared memory region, and subsequently the shared memory region for each domain that an application wants to operate within must be mapped into that application’s virtual address space.
Read more: Configuring shared memory in OpenSplice
Setting up the configuration files
For each running domain in the system you need to have an running OpenSplice daemon with a unique configuration file. The configuration file should use different DomainIds for each domain.
Each domain should use different ports for the networking service. These settings depend on which networking service you are using.
If you are using RTNetworking you need to set different values for the Discovery Port, Best Effort Channel Port and Reliable Channel Port to avoid clashes.
For DDSI2 it will work out the ports from the domain id so you do not need to do any additional configuration.
To set the Domainid
The domainid is set in the Domain section of the opensplice xml configuration file. Look for the section
<Domain>
<Id>1</Id>
</Domain>
It is always a good idea to use the OpenSplice configuration tool to modify your xml file as this will validate the xml file when you save it and prevent errors.
The domain IDs should NOT be 0 for either config and the Database addresses need to be different so the two domains do not clash.
Setting the domain id using the configuration tool
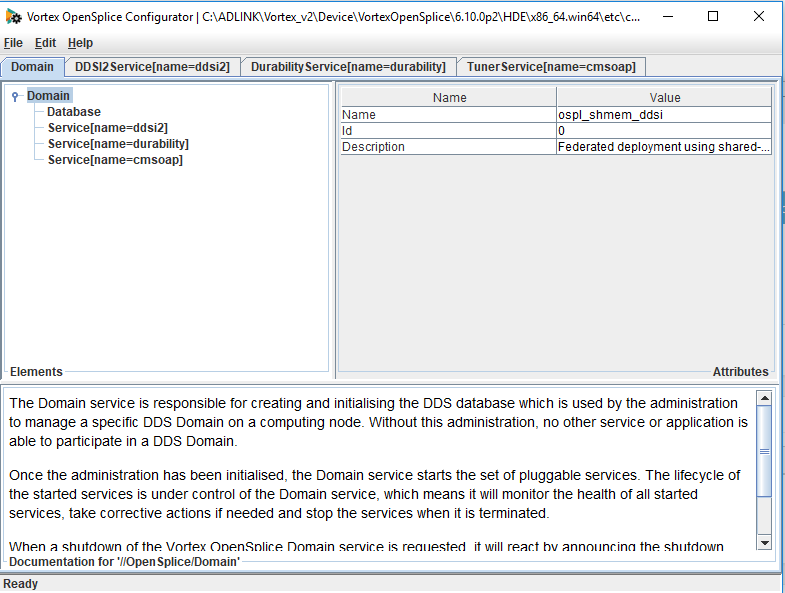
Start the OpenSplice configuration tool by using the command osplconf in a console window where the OpenSplice environment is set. This will bring up the tool.
Choose File > Open from the menu and choose the xml file you are using.
Click on the domain tab and domain at the top. In the pane at the right hand side you will see id. This is set to 0 by default. You can change this value to the value you are using for the domain you want to connect to.
Setting the Ports for DDSI2 networking service
For DDSI2 it will work out the ports from the domain id so you do not need to do any additional configuration.
Setting the Ports for RT networking service
If you are using the RT networking service you need to use different ports for each domain to prevent clashes. The RT networking service has three main ports that you need to change. These are the ports for Discovery and also the ports for the BestEffort Channel and Reliable channel. You will find them in the xml file in the following section:
<NetworkService name=”networking”>
<Channels>
<Channel default=”true” enabled=”true” name=”BestEffort” reliable=”false”>
<PortNr>54400</PortNr>
</Channel>
<Channel enabled=”true” name=”Reliable” reliable=”true”>
<PortNr>54410</PortNr>
</Channel>
</Channels>
<Discovery enabled=”true”>
<PortNr>54420</PortNr>
</Discovery>
</NetworkService>
Make sure these are set to different values for each domain.
Set address for services
Services can be defined the the domain section of the OpenSplice configuration xml document. It is important to ensure that different domains use different addresses to avoid issues. For example, if different addresses are not specified the cmsoap service may get defunct for the other domain.
<Domain>
<Id>1</Id>
<Database>
<Size>10485760</Size>
<Address>0x42000000</Address>
</Database>
<Service name=”networking”>
<Command>networking</Command>
</Service>
<Service name=”durability”>
<Command>durability</Command>
</Service>
<Service name=”cmsoap”>
<Command>cmsoap</Command>
</Service>
</Domain>
Setting the RT Networking ports using the OpenSplice Configuration Tool
It is always a good idea to use the OpenSplice configuration tool to modify the xml file. This will check the file for errors when you save.
Start the OpenSplice configuration tool using the command osplconf in a console window which has been configured to run OpenSplice.
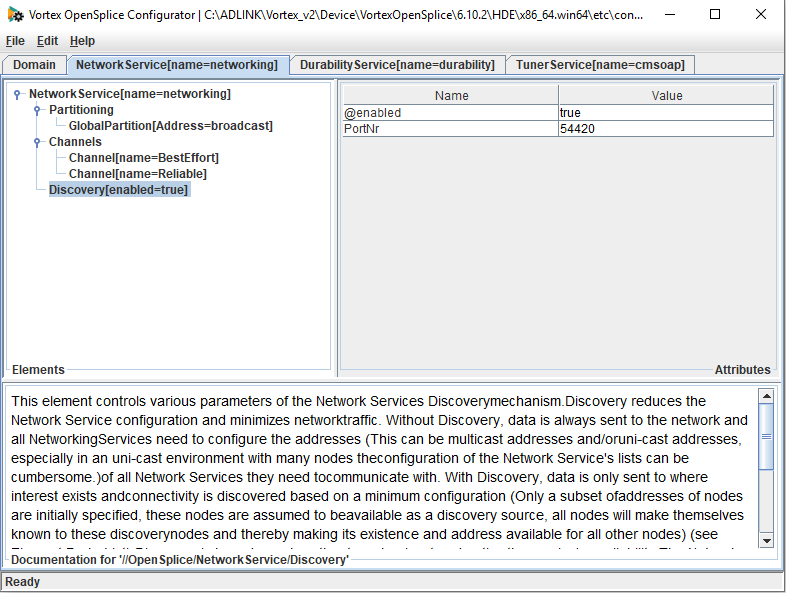
Go to the Networking Service tab.

To change the Discovery port click on Discovery. You will see the port number in the right hand pane. Click on it to change it.
You can also change the ports for the Best Effort Channel and Reliable Channel by clicking on them.
How to connect your application to two different domains
If you want an application to connect to two different domains you need to create two participants that each connect to a different domain.
When you create a domain participant the call includes the domain id of the domain you want to connect to.
participant = dpf.create_participant(DOMAIN_ID_DEFAULT.value, PARTICIPANT_QOS_DEFAULT.value, null, STATUS_MASK_NONE.value();
However in order to attach to the domain correctly it also needs to be able to find the xml configuration file which it gets from the environment variable.
In order to do this you need to use a system call to set the value of the OSPL_URI before calling create_participant. (not in Java, see below)
For the first participant:
system(“Set OSPL_URI=file://Location1/xml1”);
// OR setenv(“OSPL_URI”, “file://Location1/xml1)”;
participant = dpf.create_participant(DOMAIN_ID_DEFAULT.value, PARTICIPANT_QOS_DEFAULT.value, null, STATUS_MASK_NONE.value);
For the second participant:
system(“Set OSPL_URI=file://Location1/xml2”);
participant = dpf.create_participant(DOMAIN_ID_DEFAULT.value, PARTICIPANT_QOS_DEFAULT.value, null, STATUS_MASK_NONE.value);
Once this is done only the publishers and subscribers that are created from the same participant and attached to the same domain will communicate.
Here is some example code in C++ MultipleDomain-Example.zip
Idlpp with C++
When compiling C++ code using idlpp, the additional argument ‘-N’ must be included to allow for multiple domains.
This option disables type-catching in the copy-in routines. The copy in routines cache the type to improve the performance of copying sequences. Disabling this feature allows the use of sequences within multi-domain applications.
Java Exception for setting Environment Variable
In Java the environment variables are copied into the JVM when the process starts. Therefore the method used above will not work. We have implemented a workaround that allows the code to alter this “copy” of the variables before the call to the create participant method. This works around particular Java functionality which may change in the future and should be tested on your own platform.
- The two daemons must be running first using the two config files created (domain 1 and 2). You can use the opsl list command to check the two domains are running
- The OSPL_URI variable must already be set in the environment (i.e. from OSPL launcher) and should preferably be from one of the config files you will use.
- It will only work with Java 8 (1.8 folder). The extra code we are using brings up error messages with Java 11
We have an example using HelloWorld in java which gives the extra code as required to set this environment variable within the JVM. Helloworld

