
In this article we will demonstrate how to configure the OpenSplice DBMS Connect service to work with MySQL on both Windows and Linux.
The data-centric model utilised by DDS is a natural fit for the data-centric model utilised by relational database systems. DBMS Connect provides seamless integration between the two systems. It allows the same data to exist in the real-time DDS domain and persist in the non-real-time DBMS domain. From here it may also be consumed and changed by non-DDS applications.
DDS to DBMS with MySQL
The OpenSplice DBMS Connect service is capable of both reading from and writing to a SQL database. In this demo, we will focus on the latter use case, referred to as “DDS to DBMS”. The service will write topic samples to records in a corresponding database table. The primary key for this table will be the same as the key defined for the topic in the DDS global dataspace.
DBMS Connect is compatible with any DBMS that implements an ODBC connector*. We are using MySQL to demonstrate DBMS Connect in this article. It is popular, well supported and is easy to deploy on both Windows and Linux. It also has graphical tools to help with database administration.
Different MySQL distributions include different components depending on the version, operating system and installation procedure used (msi, zip, package manager, etc.). For this demo we will use the following components:
- MySQL Server (Community version, 8.0 or 5.7)
- MySQL Connector/ODBC (5.3.9)
- MySQL Workbench (6.3)
The MySQL download page provides information for installing these components in your environment.
*Unfortunately, not every implementation conforms to standards and thus may need some bespoke configuration.
MySQL Database Setup
We will first create a database schema to hold our new table, as well as a new (non-root) user to access it. The simplest way to do this is using MySQL Workbench. A typical install will have a connection profile for a local MySQL instance on the homepage. Click it to open a database management session.
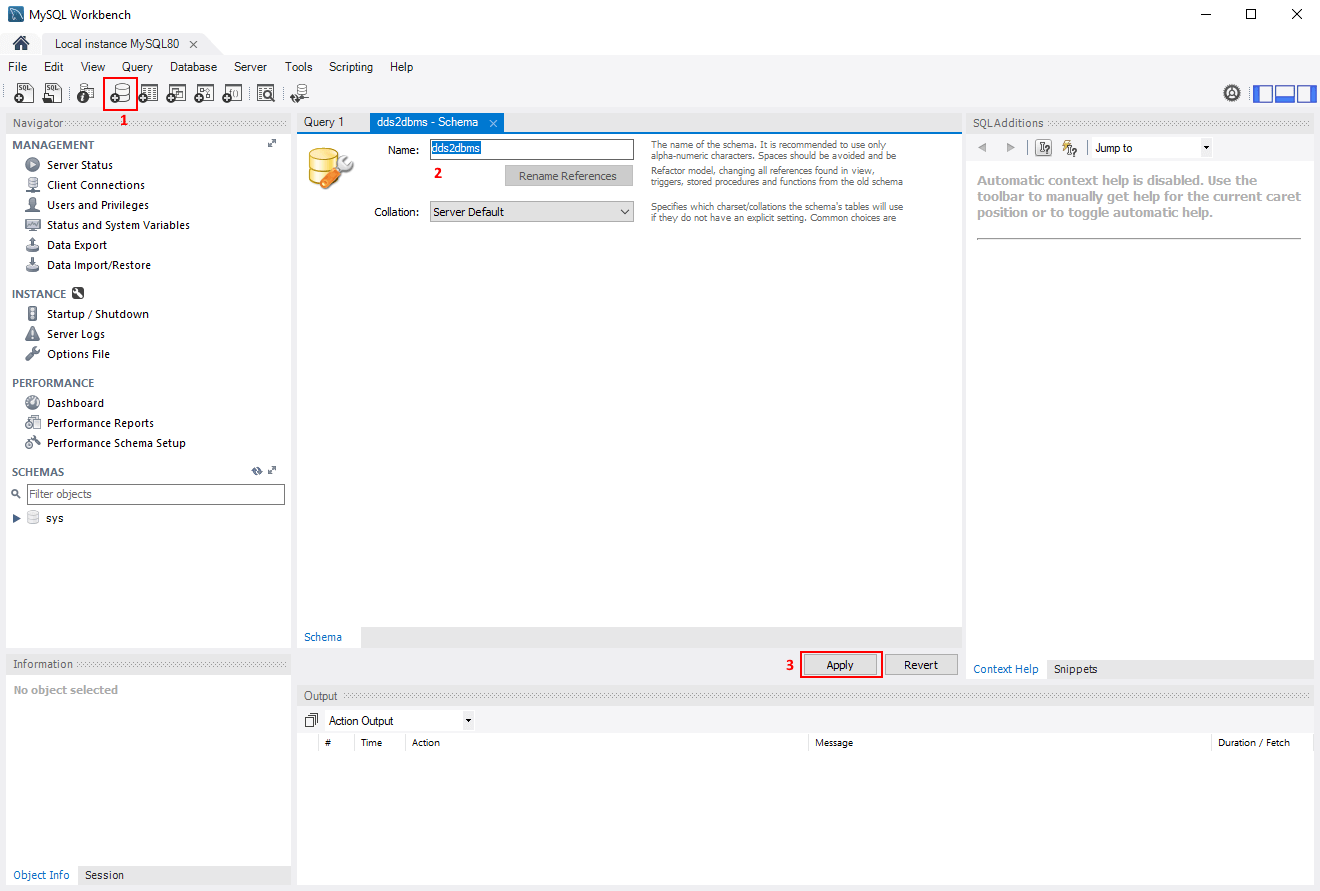
To create a new schema, click the ‘new schema’ button, name the schema – in this case “dds2dbms” – and click Apply. Another dialog will appear to confirm the SQL command. Click Apply to invoke it.
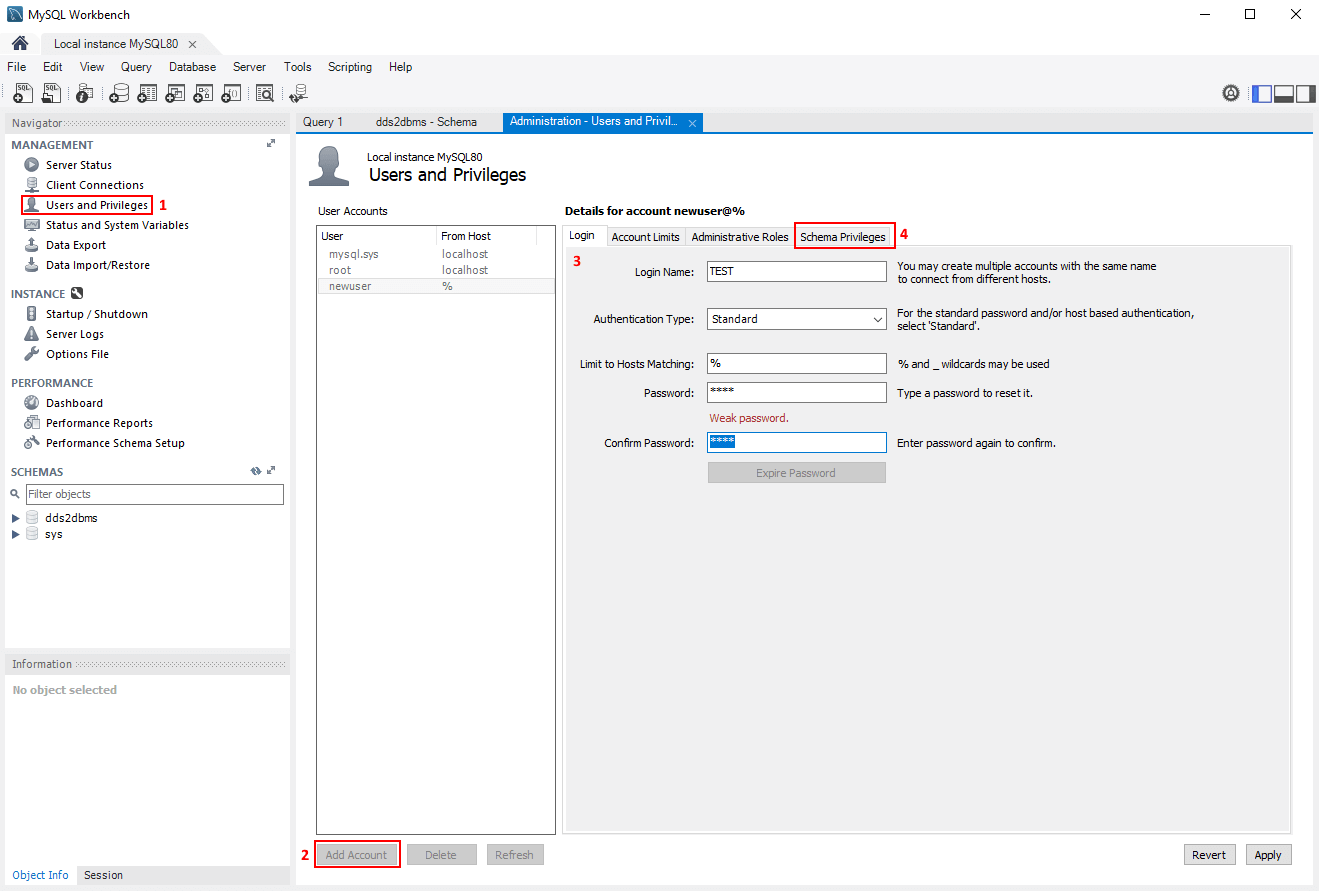
We will also create a new user to access the “dds2dbms” schema. Click on Users and Privileges, Add Account and enter details for the new user. Here we are using Username “TEST” with password “test”. We then need to grant the user privileges on “dds2dbms” under the Schema Privileges tab.
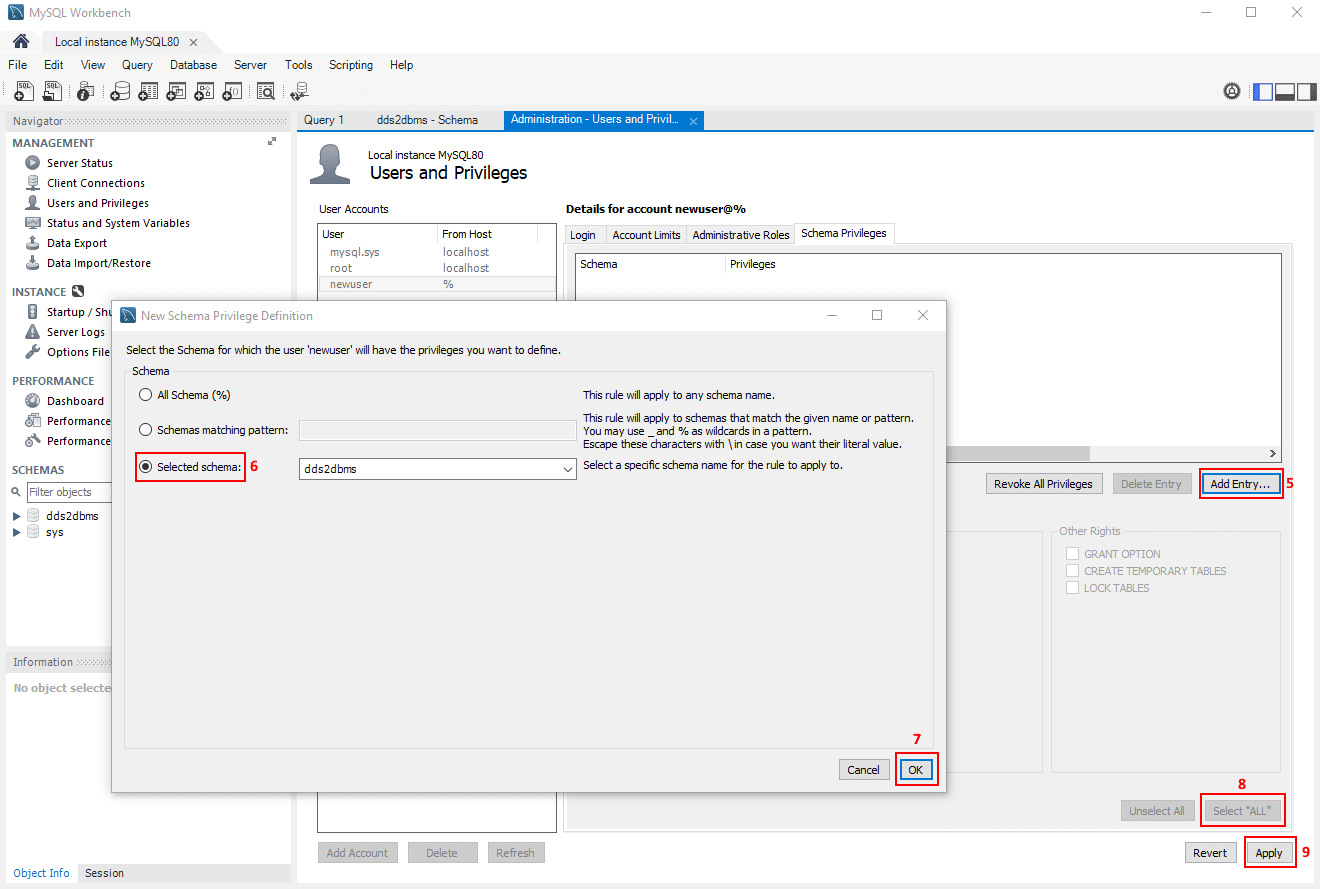
Click Add Entry…, select “dds2dbms” as the schema and click OK. For simplicity, we will grant all privileges to the new user with the Select “ALL” shortcut button. Finally, click Apply.
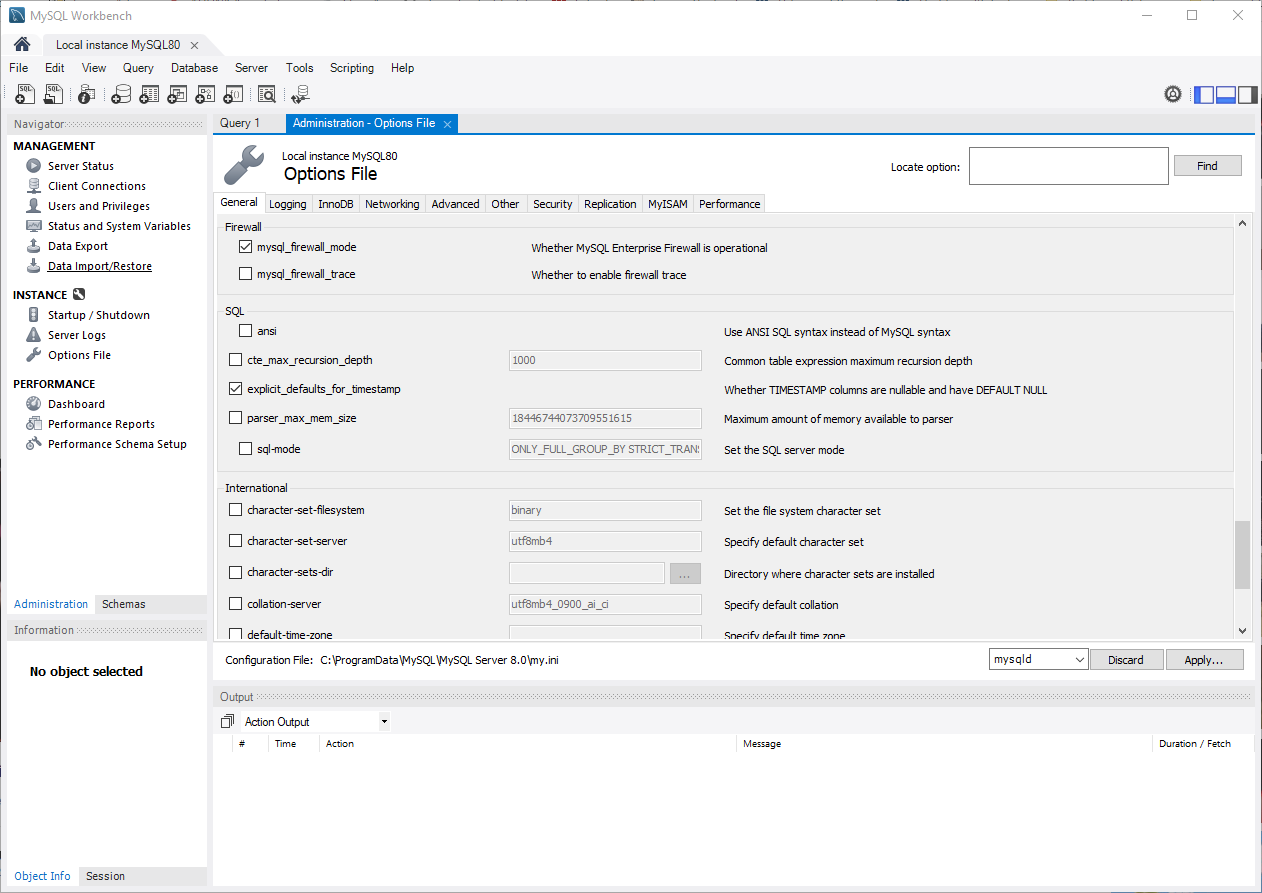
To ensure the SQL that is generated is run correctly the sql-mode needs to be updated so that it is ANSI compatible. To do so select the Options File link under INSTANCE. From here you can select the sql-mode tick box under SQL and add to the list of options ANSI. If for some reason the options file is not loaded into the editor correctly then browse in Windows to the configuration file shown at he bottom of this editor (in this example C:\ProgramData\MySQL\MySQL Server 8.0\my,ini) and update the sql-mode line to include ANSI. Here is an example (the other two options were default)
sql-mode=”STRICT_TRANS_TABLES,NO_ENGINE_SUBSTITUTION,ANSI”
ODBC Connector Setup
Both Windows and Linux utilise the MySQL Connector/ODBC component. Although, configuring it requires a very different procedure for each OS.
Windows
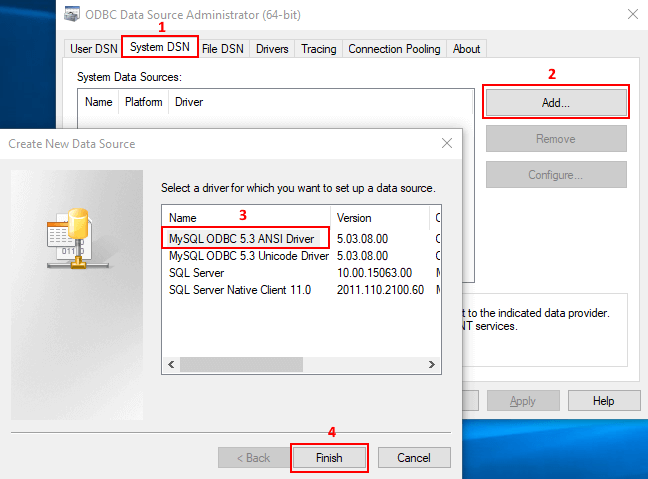
On Windows, we will use the ODBC Data Source Administrator tool that is part of the operating system. Find it via Control Panel or a start menu search for “ODBC Data Sources”. Run this program and navigate to the System DSN tab to add a new connector.
Click Add… to open a new dialog, select the MySQL ODBC “ANSI” driver and then Finish.
A MySQL Connector/ODBC dialog will now appear to input connection parameters. The Data Source Name* and Description are arbitrary. The Server, Port, User, Password and Database should correspond to what we set up in the last section. Here we use “localhost”, “3306” (the MySQL default), “TEST”, “test” and “dds2dbms”. Click the Test button to confirm that the connection parameters are valid. Finally, click OK.
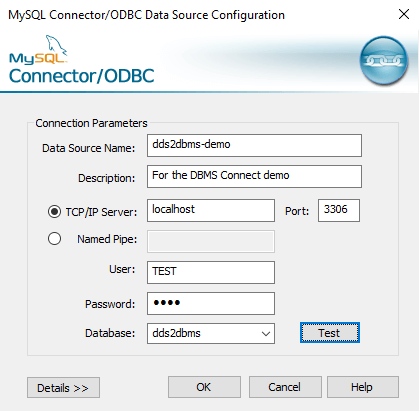
*Note: The setup will silently fail if the Data Source Name contains invalid characters such as spaces.
Linux
Unlike Windows, Linux distributions do not tend to include ODBC management tools. Thus, we will use the open source unixODBC, available to download here. Some repositories may have binaries available. Although, compiling from source guarantees the latest version for all distributions. GUI tools are also available but we will be modifying configuration files directly.
Download and extract the source to a writable location, such as your home directory. In a terminal, enter the unixODBC-<version> directory. Run “./configure”, “make” and “make install”. This will build and install the binaries to the default location. It may take a while depending on your system.
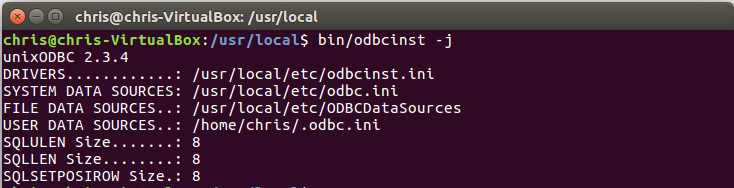
To view the configuration, change directory to “/usr/local” (by default) and run “bin/odbcinst -j”. You should get a list showing the paths to various .ini configuration files:
We need to modify the files corresponding to Drivers and System Data Sources. As a superuser, use your preferred text editor to open “odbcinst.ini” and enter the following:
[MySQL-ANSI]
Description = MySQL ANSI Driver for Debian-based systems
Driver      = /usr/local/lib/libmyodbc5a.so
Note: The path to your MySQL Connector/ODBC ANSI library, “libmyodbc5a.so” may be different.
Next, open “odbc.ini” and enter the following:
[dds2dbms-demo]
Driver       = MySQL-ANSI
Description  = For DBMS Connect demo
Server       = 127.0.0.1
Port         = 3306
User         = TEST
Password     = test
Database     = dds2dbms
Option       = 3
Socket       = /var/run/mysqld/mysqld.sock
Initstmt     = SET SESSION sql_mode= 'ansi';
The last setting, “Initstmt” is important to ensure the session runs in ANSI mode. Your value for “Socket” may also be different although this is optional. The connector uses TCP/IP if no value is specified.
To confirm the connection parameters are valid, run “bin/isql dds2dbms-demo”. This console tool will try to connect to the database. If successful, you should see a message saying “Connected!”.
OpenSplice Setup
Now we will configure the OpenSplice DBMS Connect service. It will save DDS topic samples written by the HelloWorld publisher to our database. The OpenSplice distribution includes the HelloWorld publisher in the examples directory.
HelloWorld Publisher
When writing your own applications, there is an important behaviour to note:
When a topic instance is disposed, DBMS Connect deletes the corresponding database record. By default, a DataWriter disposes a topic instance when the instance is unregistered. This behaviour is configurable via a WriterDataLifecyle object in the DataWriterQos policy. The isocpp2 example configures a policy to dispose of topic instances manually. Thus, we will use it for this demo.
You will need to compile the isocpp2 HelloWorld publisher if you have not already done so. We will not explain that step here. Please refer to $OSPL_HOME/examples/dcps/HelloWorld/README.html in your OpenSplice distribution.
OpenSplice Configuration
Launch the OpenSplice Configurator tool or your preferred text editor. Add the following to an OpenSplice configuration file, inside the “<OpenSplice>” node:
<DbmsConnectService name="dbmsconnect">
      <DdsToDbms>
          <NameSpace dsn="dds2dbms-demo" partition="HelloWorld example" pwd="test" usr="TEST">
              <Mapping table="HelloWorldData" topic="HelloWorldData_Msg"/>
          </NameSpace>
      </DdsToDbms>
</DbmsConnectService>
That’s it! The configuration parameters here are self-explanatory. The Data Source Name (DSN) points to the “dds2dbms-demo” ODBC connection we configured. Samples from the “HelloWorldData_Msg” topic will be written to the “HelloWorldData” table. Please refer to the Deployment Guide for more advanced configuration parameters. Also, do not forget to configure the “OSPL_URI” environment variable. It must point towards your new (or modified) configuration file.
Running the Demo
Open a terminal or command prompt in your “$OSPL_HOME/examples/dcps/HelloWorld/isocpp2” directory. Run the HelloWorld publisher program ( “.\publisher.exe”) and you should see the message:
=== [Publisher] writing a message containing :
userID : 1
Message : “Hello World”
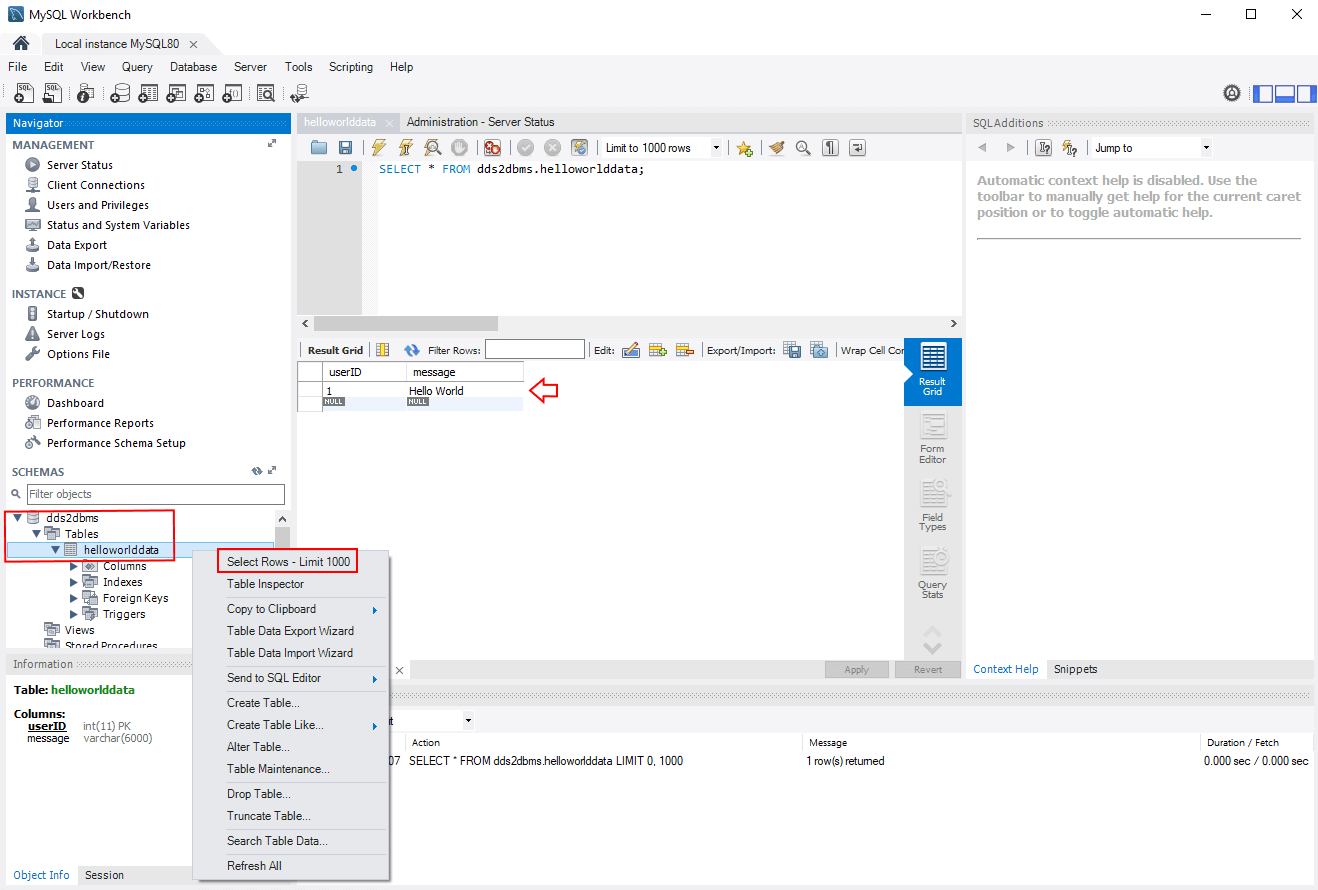
Now go back to MySQL Workbench. Under the dds2dbms schema, you should see a new table called “helloworlddata”. Right-click this list entry and then Select Rows to execute a SELECT SQL command. You should see a record in the table with the same userID (key) and message sent by the HelloWorld publisher.
That concludes this demonstration. If you would like more in-depth technical details on the DBMS Connect service, please refer to the OpenSplice Deployment Guide.